Beaded jewelry has always been an integral part of fashion jewelry, simply because the variety that is available with beads is endless and beautiful. In the art of beading, beaded earrings are the simplest to start off with, especially if you are a novice in this field. With practice, you can master the art of creating an endless variety of earrings for yourself, and can even give them away as gifts. Who knows, if you get really good at it, you can even start your own jewelry-making business.
Materials Required
2 fish hook earring wires: These are the hooks on which your beautiful earrings will dangle.
2 head pins/eye pins: Head pins are pins with a round and flat end that prevent the beads from falling off. Eye pins have loops at the ends to which you can add more beads and make the earrings longer.
Beads: The choice is endless. Mix and match colors and sizes to create your own funky designs.
Spacer beads: These are thin and round silver beads of different sizes, that are placed between the colored beads to distinguish between them.
Wire cutter: A wire cutter is used to cut the excess of the head pin.
Round nose pliers: These will help to turn the ends of the head pins into loops, into which the ear wires will be fixed.
Steps

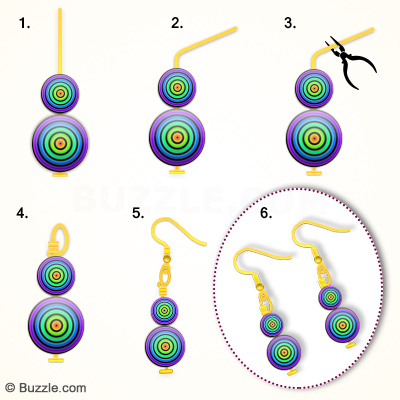
Step 1: Take a head pin and start putting the beads in the order of your choice. Use a variety of shapes, sizes, and colors, such as flat beads and round beads. You can also add pearls and Swarovski crystals if possible to add some jazz to the earrings. Use a combination that will suit your skin tone and the outfit you are planning to match the earrings with.
Step 2: Once you have put all the beads, use your hands to bend the tip of the head pin to a 45 degree angle. Hold the wire with the round nose pliers as close to the beads as possible. Now loop the wire around the pliers using your hands. Cut the excess wire using the wire cutter.
Step 3: If you want longer earrings, repeat steps 1 and 2 with eye pins, and place the eye pins in the loop created on the head pins. Once the loops have been connected, tighten the loop enough to prevent the earring from falling off.
Step 4: Once you have attained the desired length, follow step 2 to make the loop in the final pin, and connect to at a fish hook earring wire. Tightly close the loop with the round nose pliers.
Step 5: Follow the same steps to make the second beaded earring, and ensure that the length of the two earrings is the same. You can make the earrings further interesting by having some charms dangling at the bottom. Your lovely pair of earrings is now ready to be worn!
Making beaded earrings is as simple as talking about it. Instead of going out and spending money on buying them, why not learn how to make them on your own? It is definitely cheaper, makes for a great hobby, and once mastered, the art can be put to a variety of uses.


RSS